
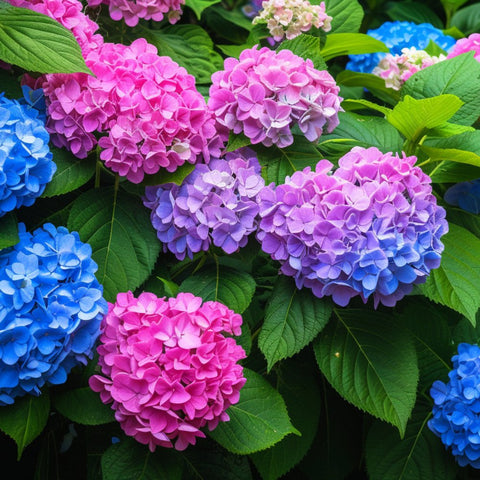
Introduction

Trimming hydrangeas in spring is an essential task for maintaining the health and beauty of these stunning flowering plants. By pruning at the right time and using proper techniques, you can promote new growth, improve overall plant vigor, and enhance the visual appeal of your hydrangeas. In this comprehensive guide, we will delve into the importance of spring trimming, provide step-by-step instructions for different hydrangea types, and address potential challenges you may encounter. Let's get started!
Understanding Hydrangeas
Before diving into the specifics of pruning, it's important to have a basic understanding of hydrangeas and their growth habits. Hydrangeas come in various types, including mophead, lacecap, panicle, smooth, and oakleaf hydrangeas. Each type has unique characteristics and requires slightly different pruning techniques. Additionally, hydrangeas have a specific growth and blooming cycle, which determines the ideal time to trim them for optimal results.
Tools and Materials Needed
Having the right tools and materials is essential for successful hydrangea trimming. Some of the essential tools you'll need include sharp hand pruners, loppers, hedge shears, and a pruning saw. Depending on the size and condition of your hydrangeas, you may also need gloves, protective eyewear, and a ladder for reaching taller branches. It's important to regularly clean and maintain your pruning tools to ensure they work efficiently and prevent the spread of diseases between plants.
Pruning Techniques for Different Hydrangea Types
Each type of hydrangea requires slightly different pruning techniques to ensure optimal growth and blooming. Here are some guidelines for pruning different hydrangea varieties:
Hydrangea Macrophylla (Mophead and Lacecap Hydrangeas)

When pruning mophead and lacecap hydrangeas, it's crucial to understand their blooming patterns. These hydrangeas bloom on old wood, which means they develop flower buds in late summer or early fall for the following year's blooms. To avoid cutting off potential blooms, it's best to trim these varieties immediately after they finish blooming in late summer. This timing allows enough time for new growth to develop and set buds for the next season.
Hydrangea Paniculata (Panicle Hydrangeas)

Panicle hydrangeas are relatively easier to prune compared to mophead and lacecap hydrangeas. These varieties bloom on new wood, which means they produce flowers on new growth that develops in the current growing season. The best time to prune panicle hydrangeas is in late winter or early spring before new growth begins. By trimming these hydrangeas during this time, you can remove any dead or damaged wood and shape the plant to your desired size and form.
Hydrangea Arborescens (Smooth Hydrangeas)

Smooth hydrangeas, often referred to as "Snowball" hydrangeas, produce large, round clusters of flowers. These hydrangeas can be pruned in late winter or early spring before new growth starts. It's best to cut back smooth hydrangeas to 6-12 inches above the ground to encourage vigorous growth and abundant blooms. Removing old wood and shaping the plant will also help maintain its overall health and appearance.
Hydrangea Quercifolia (Oakleaf Hydrangeas)

Unlike other hydrangea varieties, oakleaf hydrangeas provide year-round interest with their attractive foliage and showy blooms. The best time to prune oakleaf hydrangeas is after flowering, typically in late summer or early fall. This timing allows the plant to set new buds for the following year's blooms. It's important to avoid cutting off potential flower buds when trimming oakleaf hydrangeas, as they bloom on old wood.
Step-by-Step Guide to Trimming Hydrangeas
Now that you have an understanding of the different hydrangea types and their pruning requirements, let's dive into a step-by-step guide to trimming hydrangeas:
Step 1: Prepare and Start the Trimming Process
Before you begin, gather all the necessary tools and materials, including pruners, loppers, gloves, and eyewear. Inspect your hydrangea for any signs of disease or pest infestation before proceeding. Choose a clear, dry day to minimize the risk of spreading fungal diseases.
Step 2: Identify Which Branches to Cut
When starting to trim your hydrangea, focus on cutting out dead, damaged, or diseased wood first. Removing these branches will improve the overall health of the plant and prevent the spread of infections. Look for branches that are discolored, shriveled, or have blackened tips. Cut these branches back to healthy growth using clean, sharp pruners.
Step 3: Remove Crossing Branches
Next, identify any branches that are crossing or rubbing against each other. These branches can cause damage and inhibit proper air circulation within the plant. Choose one of the crossing branches to keep and remove the other by cutting it back to the main stem or parent branch. This will help maintain a balanced and open structure for the hydrangea.
Step 4: Trim Old Flowers
If your hydrangea is done blooming, it's important to remove the old flower heads to promote new growth and encourage a neater appearance. Cut each faded flower stem back to a healthy bud or set of leaves. This will redirect the plant's energy to producing new branches and potential flower buds for the next blooming season.
Step 5: Maintain Desired Shape and Size
As you trim your hydrangea, keep in mind the desired shape and size you want to achieve. If you prefer a more compact and tidy appearance, you can prune more aggressively by cutting back branches to a shorter length. For a more natural and relaxed look, minimal pruning may be necessary. Regular trimming will help maintain the desired shape and size of your hydrangea over time.
Dealing with Potential Challenges and Concerns
While trimming hydrangeas can be a straightforward process, certain challenges and concerns may arise. Here are some common problems you may encounter and tips for handling them:
Overgrown or Neglected Hydrangeas
If your hydrangea has become overgrown or hasn't been trimmed in a long time, you may need to take more drastic pruning measures. Gradually remove approximately one-third of the plant's branches each year over a span of three years to avoid shocking the plant. This approach will allow the hydrangea to recover and rejuvenate properly.
Diseases and Pests
Hydrangeas can be susceptible to various diseases and pests, including powdery mildew, leaf spot, and aphids. To prevent the spread of diseases, ensure you clean and sterilize your pruning tools between cuts. If you notice any signs of disease or pest infestation, consult a local gardening expert or extension service for appropriate treatment methods.
Aftercare and Maintenance
Once you have finished trimming your hydrangeas, it's important to provide proper aftercare to encourage healthy growth and blooming. Here are some tips for post-trimming maintenance:
Cleaning Up and Disposing of Trimmings
Collect all the trimmings and properly dispose of them, either by composting or through your local green waste collection service. It's important to remove any plant debris to reduce the risk of fungal diseases and pests.
Watering, Fertilizing, and Mulching

After trimming, give your hydrangeas a thorough watering to help them recover from the stress of pruning. Apply a balanced fertilizer specifically formulated for hydrangeas to provide essential nutrients. Finally, apply a layer of organic mulch around the base of the plants to conserve moisture, suppress weed growth, and maintain even soil temperatures.
Ongoing Maintenance
Regularly monitor your hydrangeas for signs of disease, pests, or nutrient deficiencies. Make sure to water them during dry spells, but avoid overwatering, as this can lead to root rot. Adjust your fertilization schedule based on the specific needs of your hydrangea variety. By maintaining proper aftercare, you can ensure the long-term health and vibrancy of your hydrangeas.
Final Thoughts and Recap
Trimming hydrangeas in spring is a crucial task for promoting plant health, improving appearance, and ensuring optimal blooming. By understanding the specific pruning techniques for different hydrangea types and following a step-by-step guide, you can confidently trim your hydrangeas and enjoy their beauty throughout the season. Remember to consider the timing, prepare the necessary tools, and maintain the desired shape and size while trimming. With proper aftercare and ongoing maintenance, your hydrangeas will flourish for years to come.
References and Additional Resources
For more information and in-depth guidance on pruning hydrangeas, consider exploring the following sources:
- Smith, D., & Evans, H. (2018). The Pruning Book. Timber Press.
- Dole, J. (2016). Hydrangeas: How to Grow, Cultivate, and Enjoy. Cool Springs Press.
- Gardening Know How - How to Prune Hydrangea Bushes
- University of Minnesota Extension - Growing Hydrangeas
Conclusion
Trimming hydrangeas in spring is a rewarding task that not only improves the health and appearance of the plants but also allows you to create a beautiful outdoor space. By following the techniques and tips outlined in this comprehensive guide, you can confidently prune your hydrangeas and enjoy their vibrant blooms for years to come. Don't hesitate to share this guide with fellow gardening enthusiasts, as it's packed with valuable insights and tips to achieve optimal results. Happy trimming!


Comments (0)
There are no comments for this article. Be the first one to leave a message!