
Blog Post - Transplanting Iris in Spring
Are you ready to breathe new life into your flower garden? Transplanting iris flowers in the spring can bring a burst of color and beauty to your outdoor space. In this comprehensive guide, we will explore the benefits of transplanting iris in the spring, provide step-by-step instructions on how to do it, and offer valuable tips for caring for your newly transplanted iris. Let's dive in and create a vibrant garden together!
The Benefits of Transplanting Iris in Spring

Spring is the perfect time to transplant your iris flowers for several reasons. Firstly, the weather conditions during this season are ideal for the plants' establishment. The moderate temperatures, ample sunlight, and occasional rainfall create a nurturing environment for the irises to take root and thrive.
Secondly, transplanting iris in the spring provides ample time for the roots to develop before the scorching summer heat sets in. This gives the plants a chance to establish a strong root system, allowing them to better withstand the heat and drought that may come later in the season.
Lastly, transplanting iris in the spring increases the chances of successful transplantation and blooming. The plants have a longer growing season ahead, allowing them to acclimate to their new surroundings and produce beautiful blooms for you to enjoy.
Preparing for Transplantation
Selecting the Right Location for the Irises
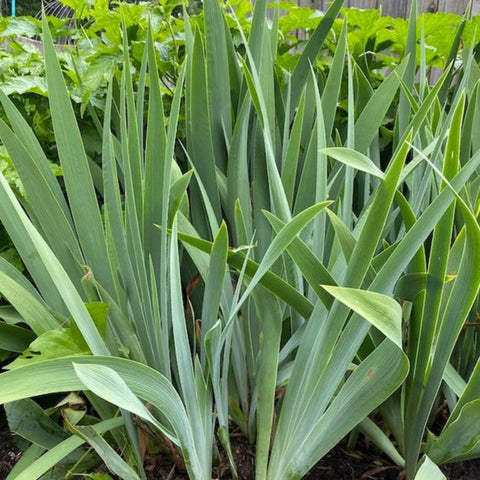
Before transplanting iris flowers, it's crucial to choose the right location in your garden. Irises thrive in well-drained soil, so make sure the area has good drainage to prevent waterlogged roots. Additionally, irises require at least six hours of direct sunlight each day to bloom their best, so select a spot that receives ample sunlight.
Gathering the Necessary Tools and Materials
To ensure a successful transplant, gather the following tools and materials:
- Shovel or garden fork: These will come in handy for digging up the iris rhizomes.
- Pruning shears or scissors: You'll need these to trim back any dead or damaged foliage.
- Containers or bags: Use these to store and transport the iris rhizomes during the transplantation process.
Steps to Transplant Iris in Spring

Step 1: Digging up the Rhizomes
Start by digging around the clumps of iris plants, gently loosening the soil around the rhizomes. Carefully lift the clumps out of the ground, making sure to keep the rhizomes intact.
Step 2: Preparing the New Planting Site

Prepare the new planting site by removing any weeds or debris. Loosen the soil and incorporate organic matter, such as compost or well-rotted manure, to improve its texture and fertility.
Step 3: Dividing and Trimming the Rhizomes

Once the rhizomes are out of the ground, divide them by cutting them into smaller sections. Each section should have a healthy fan of leaves and a viable root system. Trim back any dead or damaged foliage to promote new growth.
Step 4: Planting the Iris Rhizomes

Dig holes in the new planting site, spacing them 12 to 24 inches apart depending on the iris variety. Place the rhizomes in the holes, positioning them horizontally with the fan of leaves facing upwards. Cover the rhizomes with soil, gently firming it around them.
Step 5: Proper Watering Techniques

After planting, water the transplanted irises thoroughly to settle the soil and provide moisture for their roots. Water regularly, keeping the soil consistently moist but not waterlogged. Irrigate deeply to encourage the roots to grow deep, ensuring the plants' long-term health and resilience.
Step 6: Mulching and Protecting the Transplants
Apply a layer of organic mulch around the newly transplanted iris to help conserve soil moisture, suppress weeds, and regulate soil temperature. Avoid covering the rhizomes with mulch, as this can cause them to rot. Additionally, protect your transplants from strong winds or extreme weather conditions, providing temporary shelter until they establish themselves.
Caring for Newly Transplanted Iris

Watering and Fertilizing Requirements
Continued watering is essential for newly transplanted irises, especially during their first season. Keep the soil consistently moist, but be cautious not to overwater, as it can lead to root rot. As the plants' foliage grows, you can apply a balanced fertilizer to promote healthy growth and vibrant blooms.
Pest and Disease Control
Monitor your transplanted irises regularly for any signs of pests or diseases. Aphids, iris borers, and slugs are common pests that can damage your plants. Promptly address any infestations or diseases by using appropriate organic pest control methods or seeking professional advice if necessary.
Regular Monitoring and Maintenance
Keep a close eye on your transplanted irises throughout the growing season. Monitor their growth, inspect for any signs of stress or nutrient deficiencies, and promptly address any issues that arise. Regular maintenance tasks, such as deadheading spent blooms and removing faded foliage, will encourage continuous blooming and a tidy appearance.
Troubleshooting Transplantation Challenges
Poor Root Development and Lack of Growth
If you notice poor root development or lack of growth in your transplanted irises, ensure they are receiving adequate sunlight, water, and nutrients. Consider adjusting the planting depth or transplanting them to a more suitable location if necessary.
Fungal or Bacterial Infections
Fungal or bacterial infections can be detrimental to your transplanted irises. Maintain proper sanitation practices by removing any infected foliage or rhizomes and disposing of them appropriately. Apply an organic fungicide or consult with a professional if the infection persists.
Pests Damaging the New Transplants
If pests are damaging your transplanted irises, you can use various organic pest control methods. Introduce beneficial insects, such as ladybugs or lacewings, to combat aphids or consider installing physical barriers or traps to deter slugs or iris borers.
Conclusion
By transplanting your iris flowers in the spring, you can set the stage for a stunning flower garden. The benefits of this seasonal transplant are numerous, from the favorable weather conditions to the increased chance of successful blooming. Follow the step-by-step guide provided, care for your transplanted irises diligently, and troubleshoot any challenges that arise. With proper care and attention, your irises will soon flourish, bringing joy and beauty to your outdoor space. Get your gardening gloves ready and let's embark on a colorful journey!


Comments (3)
We bought a house that is 20 years old and the garden is too. Their are lots of iris in the garden, but the blooms are not big. Are they too old? Should I just fertilize them? And if so, with what?
We bought a house that is 20 years old and the garden is too. Their are lots of iris in the garden, but the blooms are not big. Are they too old? Should I just fertilize them? And if so, with what?
We bought a house that is 20 years old and the garden is too. Their are lots of iris in the garden, but the blooms are not big. Are they too old? Should I just fertilize them? And if so, with what?