Witch Hazel (Hamamelis) is a remarkable plant known for its late fall blooms that add a burst of color to the garden when most other plants have faded. In this guide, we’ll explore how to plant and care for Witch Hazel, ensuring you enjoy its vibrant blossoms in the late autumn months.

Understanding Witch Hazel
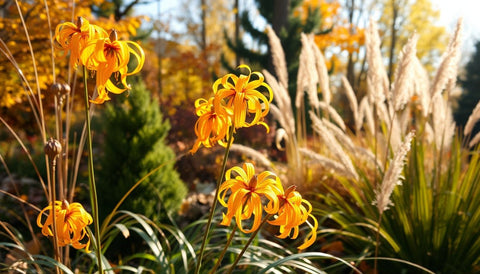
Witch Hazel is a deciduous shrub or small tree that features distinctive, ribbon-like flowers that bloom in the fall or early winter. The blossoms, ranging from yellow to orange and red, provide an eye-catching display in the garden.
Varieties of Witch Hazel
- Hamamelis virginiana - Blooms in late fall.
- Hamamelis mollis - Known for its fragrant yellow flowers.
- Hamamelis x intermedia - A hybrid that offers vibrant colors and prolonged bloom times.
The unique quality of Witch Hazel is its ability to bloom when most other plants are dormant, making it a standout in the landscape.
Ideal Growing Conditions
Witch Hazel thrives in a variety of climates but prefers growing in hardiness zones 3 to 9, depending on the variety.
Soil Requirements
Witch Hazel prefers well-drained, slightly acidic to neutral soil. Amending heavy soil with organic matter helps improve drainage.
Sunlight Requirements
Witch Hazel grows best in full sun to partial shade. It requires at least 6 hours of sunlight for optimal blooming, though some varieties can tolerate more shade.
Choosing the Right Location
When planting Witch Hazel, it’s important to consider its mature size, which can reach up to 10 to 15 feet in height and spread. Choose a location that offers enough space for the plant to thrive and avoids competition with other large plants.
Companion Planting
Witch Hazel pairs well with evergreens, ornamental grasses, and other fall-blooming perennials, creating a dynamic landscape even in the colder months.
Planting Witch Hazel
The best time to plant Witch Hazel is in the late fall when the plant is dormant. Follow these steps for a successful planting:
- Prepare the soil by loosening it and mixing in compost for better drainage.
- Dig a hole twice the width of the root ball and just as deep.
- Place the root ball in the hole, making sure the top is level with the soil surface.
- Backfill with soil, water thoroughly, and add mulch to retain moisture.
For first-time planters, be sure to water the plant regularly, especially in the first few years while it establishes its roots.
Care and Maintenance
Once established, Witch Hazel requires minimal maintenance but benefits from regular care:

Watering
Water regularly during dry spells, ensuring the soil remains evenly moist but not waterlogged.
Fertilization
Apply a balanced fertilizer in early spring to encourage healthy growth.
Pruning
Prune Witch Hazel after flowering to shape the plant and remove any dead or crossing branches.
Pest and Disease Management
Witch Hazel is generally pest-resistant, though it’s important to monitor for aphids and fungal diseases, especially in damp conditions.
Enjoying Late Fall Blooms
Witch Hazel typically blooms from late fall through early winter, making it a focal point in the garden when few other plants are in flower. Pair it with evergreens or other late bloomers to create a vibrant fall display.
Companion Plants
Consider pairing Witch Hazel with plants like hellebores, asters, or ornamental grasses to enhance the autumn garden palette.

Conclusion
Witch Hazel is a wonderful addition to any garden, offering stunning late fall blooms and year-round interest. Whether you’re a seasoned gardener or just starting, planting Witch Hazel is a rewarding endeavor. Why not try adding one to your garden this fall?
Additional Resources
Suggested Visuals
- Photos of Witch Hazel in bloom
- Step-by-step planting images
- Before and after shots of a garden featuring Witch Hazel













Comments (0)
There are no comments for this article. Be the first one to leave a message!