
Are you looking to add a touch of elegance to your garden? Look no further than iris plants. These stunning flowers have long been a favorite among gardeners for their vibrant colors and intricate patterns. Planting iris in the spring not only ensures better establishment but also allows you to enjoy their beautiful blooms during the summer. In this comprehensive guide, we will explore the appeal of iris plants, understand their various types, discuss the benefits of planting them in spring, provide step-by-step instructions for soil preparation and bulb planting, offer useful tips for caring and dealing with potential issues, and ultimately, motivate you to give iris plants a try in your own garden.
Understanding Iris Plants

Before we jump into the benefits of planting iris in spring, let's take a moment to appreciate the beauty and diversity of iris plants. Irises belong to the Iridaceae family and come in various types, each with its unique characteristics. The most common types of iris plants include:
1. Bearded Iris

One of the most popular types, bearded iris, is known for its distinctive "beard" that is present on the lower petals. These irises come in a wide range of colors, including shades of purple, blue, yellow, white, and even bi-color variations. They typically bloom in late spring and early summer, adding a splash of color to any garden.
2. Siberian Iris

Siberian iris is prized for its delicate and graceful appearance. These irises produce slender stems with beautiful flowers that come in shades of blue, purple, white, and yellow. Unlike bearded irises, they lack the characteristic "beard" but make up for it with their elegance and versatility in garden designs.
3. Japanese Iris

Japanese iris, also known as Iris ensata, is native to Japan and grows best in wet or boggy soil conditions. These irises are known for their impressive size and striking beauty. With large, ruffled petals in shades of purple, blue, pink, and white, Japanese irises create a captivating focal point in any garden.
4. Dutch Iris

Dutch iris, also called Iris hollandica, is a popular choice for cut flower arrangements due to its elegant, long stems. These irises bear flowers in shades of blue, purple, yellow, and white, making them a versatile addition to any garden or floral display.
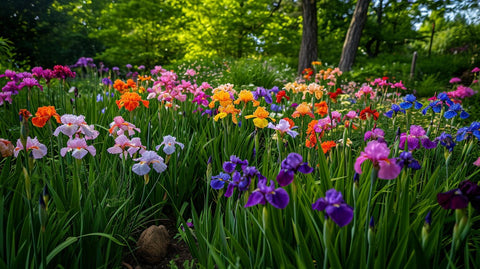
Regardless of the type, iris flowers come in a wide range of colors and patterns, making them a favorite among garden enthusiasts. From solid hues to intricate designs, there's an iris to suit every taste and garden style.
Benefits of Planting Iris in Spring

Now that we have a better understanding of iris plants, let's delve into the advantages of planting them in the springtime. Here's why spring is the ideal time for planting iris:
1. Soil Temperatures and Moisture Levels
In spring, the soil temperatures begin to warm up, creating favorable conditions for the growth and establishment of iris plants. Additionally, spring showers provide ample moisture, ensuring that the newly planted irises have enough hydration to thrive.
2. The Growth Cycle of Iris Plants
Iris plants have a specific growth cycle that aligns perfectly with spring planting. By planting iris bulbs or corms in the spring, you allow them to establish their root systems before the hot summer months. This early start gives them the best chance of producing robust foliage and stunning blooms.
By planting iris in spring, you set them up for success and increase the likelihood of enjoying a bountiful display of colorful flowers in the coming months.
Preparing the Soil for Iris Plants
Before planting iris bulbs or corms, it's essential to prepare the soil properly. Follow these step-by-step instructions to create an optimal growing environment for your iris plants:
1. Testing Soil pH Levels and Amending if Necessary
Iris plants prefer slightly acidic to neutral soil, with a pH level between 6.0 and 7.0. Test your soil using a pH testing kit and make any necessary amendments to adjust pH levels. Adding materials such as peat moss or sulfur can help lower the pH, while lime can raise it if needed.
2. Clearing the Planting Area of Weeds and Debris
Remove any existing weeds, grass, or debris from the planting area. Weeds can compete with your iris plants for nutrients and water, affecting their growth and overall health. Clearing the area ensures that the irises have the best chance to flourish.
3. Loosening the Soil for Better Drainage
Iris plants prefer well-draining soil to prevent root rot and other water-related issues. Use a garden fork or tiller to loosen the soil, breaking up any compacted areas and improving drainage. This step is crucial for promoting healthy root development.
4. Adding Organic Matter such as Compost
Incorporate organic matter, such as compost, into the soil to enhance its fertility and structure. Organic matter improves the soil's ability to hold moisture while also providing essential nutrients for your iris plants. Spread a layer of compost over the planting area and mix it into the soil to a depth of about six inches.
Once the soil preparation is complete, you are ready to move on to selecting and planting your iris bulbs or corms.
Choosing and Planting Iris Bulbs/Corms
When it comes to planting iris, it's important to understand the difference between bulbs and corms, as well as know how to select and plant them correctly. Follow these guidelines for successful iris planting:
1. Difference Between Iris Bulbs and Corms
Iris bulbs and corms are often used interchangeably, but they have distinct differences. Bulbs have concentric layers and produce new growth from inside the bulb, while corms are solid and new growth emerges from the top of the corm. Be aware of whether you are purchasing bulbs or corms when selecting your iris plants.
2. Criteria for Selecting Healthy Iris Bulbs/Corms
When choosing iris bulbs or corms, look for firm, plump specimens. Avoid any that are soft, moldy, or show signs of damage or disease. Select bulbs or corms that are at least one to two inches in diameter, as smaller bulbs may take longer to establish and produce blooms.
3. Instructions for Planting Iris Bulbs/Corms
Digging holes and spacing the bulbs or corms correctly is crucial for their successful growth. Here are the steps to follow when planting iris bulbs or corms:
a. Digging Holes and Spacing the Bulbs/Corms Properly
Using a trowel or garden spade, dig holes that are wide enough to accommodate the bulbs or corms without crowding them. Space the bulbs or corms around 12 to 24 inches apart, allowing enough room for the foliage to spread as the plants grow.
b. Orienting the Bulbs/Corms Correctly
Place the iris bulbs or corms in the holes with their pointed ends facing upwards. Make sure that the top of the bulb or corm is just below the soil surface. Proper orientation ensures that the growing points will emerge correctly.
c. Covering them with Soil and Watering Adequately
Gently backfill the holes, covering the bulbs or corms with soil. Press the soil down lightly to remove any air pockets. Water the area thoroughly to settle the soil and provide hydration to the newly planted bulbs or corms.
By following these planting guidelines, you can give your iris plants the best start for healthy growth and blooming.
Caring for Iris Plants

Proper care is paramount for the success of your iris plants. Here are some essential tips to ensure your irises thrive:
A. Watering Needs of Iris Plants
Iris plants require regular watering, especially during dry periods. Aim to provide about an inch of water per week, either through rainfall or supplemental irrigation. Ensure that the soil is moist but not waterlogged, as excessive moisture can lead to fungal diseases.
B. Importance of Mulching for Moisture Retention and Weed Control
Applying a layer of mulch around your iris plants offers numerous benefits. Mulch helps retain soil moisture, preventing excessive drying out, and also suppresses weed growth. Organic mulches, such as shredded bark or compost, work well for iris plants.
C. Necessity of Fertilizing Iris Plants
Iris plants benefit from regular fertilization to promote healthy growth and abundant blooms. Use a balanced, slow-release fertilizer or a specially formulated iris fertilizer. Follow the instructions on the package for the appropriate application rate and timing.
1. Types of Fertilizers Suitable for Iris Plants
Choose a fertilizer with a balanced ratio of nitrogen, phosphorus, and potassium, such as a 10-10-10 or 10-6-4 formulation. Alternatively, opt for a specially formulated iris fertilizer that provides the essential nutrients irises need for optimal growth.
2. Frequency and Timing of Applications
Apply fertilizer once in the spring when new growth emerges, and again after flowering to support the development of healthy bulbs or corms for the next season. Follow the package instructions for the specific fertilizer you are using, as application rates and timing may vary.
D. Importance of Providing Adequate Sunlight and Air Circulation
Iris plants thrive in full sun to partial shade conditions, receiving at least six hours of sunlight per day. Ensure that the planting area allows for proper air circulation, as good airflow helps prevent diseases and keeps the foliage dry.
Dealing with Potential Issues
Despite their resilience, iris plants can face a few common pests and diseases. Here are some potential issues you may encounter and tips for dealing with them:
A. Common Pests and Diseases
1. Iris Borers
Iris borers are the larvae of certain moths that feed on iris plants. Look for wilting or yellowing foliage and tiny holes in the leaves, indicating borer presence. Remove and destroy affected plant parts, and consider applying an insecticide specifically labeled for iris borers if the problem persists.
2. Slugs and Snails
Slugs and snails are notorious for feeding on the leaves and flowers of iris plants. Use organic slug and snail control methods, such as beer traps or copper tape, to deter these pests and protect your irises.
3. Leaf Spot and Bacterial Soft Rot
Leaf spot and bacterial soft rot are two common diseases that can affect iris plants. Avoid overhead watering to prevent water sitting on the foliage, as this can promote disease development. Remove and destroy any infected plant material and consider applying appropriate fungicides with the guidance of a local extension office.
Conclusion

Planting iris in spring is a surefire way to enjoy the radiant beauty of these flowers in your garden. By following the guidelines outlined in this comprehensive guide, you can ensure successful establishment and care for your iris plants. From understanding the various types of iris plants to preparing the soil, selecting and planting bulbs or corms, and providing proper care, your efforts will be rewarded with a colorful display of blooms. So, why not incorporate the elegance of iris plants into your garden and experience the joy they bring? Start your iris planting journey this spring and watch your garden flourish with vibrant, captivating colors.


Comments (0)
There are no comments for this article. Be the first one to leave a message!